One of my recent projects tasked me with figuring out how to recreate the magnifying glass effect that Apple uses inside textfields on the iPhone, but in a more generic way so anything on the screen could be magnified. Getting this effect is pretty simple in any visual framework once you figure out how masking works and which api will let you draw a bitmap of a given graphics layer. While the logic was simple enough, finding the right combination of apis was the painful part but I finally figured it out and wanted to share the code with everyone else trying to accomplish this task.
First up an example of what we’re able to accomplish with this effect.
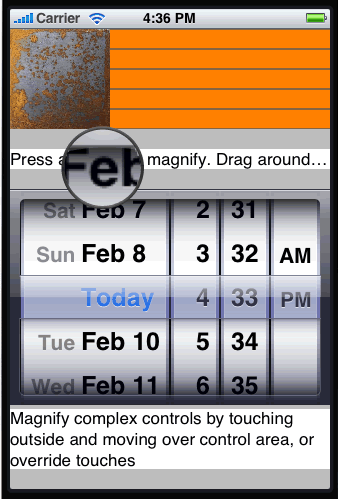
You can magnify any UIView as well as the children of that view, images, text and 2d vectors are captured and magnified appropriately. There are couple critical pieces of this code to pay attention to.
First up, when a touch has been recorded long enough to kick off the magnifier effect, we create a new magnifier view that is the exact size of the view we want to magnify. This is important due to the way we’re going to be copying a bitmap of the original view. Once we know the view exists we call setNeedsDisplay on it which triggers drawRect inside of it.
if(loop == nil){
	loop = [[MagnifierView alloc] initWithFrame:self.bounds];
	loop.viewref = self;
	[self addSubview:loop];
}
UITouch *touch = [touches anyObject];
loop.touchPoint = [touch locationInView:self];
[loop setNeedsDisplay];
Next, when drawRect gets called inside the magnifier view we want to make a copy of the original view first. The reason the magnifier view is teh same size as the original view is because we are rendering the full context of the original view into our new context before grabbing a bitmap of it. If the magnifying view were smaller, the rendered bitmap would also be smaller. We want to cache the final bitmap so we’re not redrawing the original view every time the user moves their finger around the view. We’ll destroy that cached view and the magnifying glass when the user lets up off the screen.
- (void)drawRect:(CGRect)rect {
	if(cachedImage == nil){
		UIGraphicsBeginImageContext(self.bounds.size);
		[self.viewref.layer renderInContext:UIGraphicsGetCurrentContext()];
		cachedImage = [UIGraphicsGetImageFromCurrentImageContext() retain];
		UIGraphicsEndImageContext();
	}
Following that we need to generate a masked view for the magnified view to sit in, since the loop is a circle we have to mask out the corners and antialias the outer perimeter. This is accomplished using 2 images, the magnifying glass itself and a mask image with appropriate grayscale levels for masking.
CGImageRef imageRef = [cachedImage CGImage];
CGImageRef maskRef = [[UIImage imageNamed:@"loopmask.png"] CGImage];
CGImageRef overlay = [[UIImage imageNamed:@"loop.png"] CGImage];
CGImageRef mask = CGImageMaskCreate(CGImageGetWidth(maskRef),
					CGImageGetHeight(maskRef),
					CGImageGetBitsPerComponent(maskRef),
					CGImageGetBitsPerPixel(maskRef),
                                        CGImageGetBytesPerRow(maskRef),
					CGImageGetDataProvider(maskRef),
					NULL,
					true);
//Create Mask
CGImageRef subImage = CGImageCreateWithImageInRect(imageRef, CGRectMake(touchPoint.x-18, touchPoint.y-18, 36, 36));
CGImageRef xMaskedImage = CGImageCreateWithMask(subImage, mask);
Lastly, we’ll draw the magnifying glass and magnfied bitmap copy of our orginal view underneath the mask and we’re done. Since the iPhone uses a different coordinate system then other languages, we have to remember to flip the view upside down before drawing it.
CGContextRef context = UIGraphicsGetCurrentContext();
CGAffineTransform xform = CGAffineTransformMake(
					1.0,  0.0,
					0.0, -1.0,
					0.0,  0.0);
CGContextConcatCTM(context, xform);
CGRect area = CGRectMake(touchPoint.x-42, -touchPoint.y, 85, 85);
CGRect area2 = CGRectMake(touchPoint.x-40, -touchPoint.y+2, 80, 80);
CGContextDrawImage(context, area2, xMaskedImage);
CGContextDrawImage(context, area, overlay);
And that’s it, now we have a modular magnifying glass that can plug in to any UIView with minimal effort. If you’re looking for a way to add interactivity underneath the magnifying glass, like moving the cursor within a textfield, that’s gonna require a bit more custom code on the control you’re dealing with, and this example doesn’t really address that.
Download example: XCode magnifier example for iPhone.
You are missing a file from your project. Can you check it out and fix?
First, thanks so much for the code. Man, this was a life-saver. I’m decent with standard UI elements but the minute I have to dig into drawing my own custom UI elements, I’m lost. Since I needed a loupe, your code was perfect!
I made a change: I needed to change the loupe’s image on every move. I was able to do that but found, rather quickly, that MagnifierView.m ate up memory. Given your generosity in providing most of the code, I thought I would submit to you a small bug fix to deal with the memory leak issue.
In MagnifierView.m at the bottom of drawRect, I added the following three lines:
CGImageRelease(mask);
CGImageRelease(subImage);
CGImageRelease(xMaskedImage);
Thanks again.
Thanks Elia, I’m still learning many of the C conventions myself and memory issues associated with certain conventions.
Thanks a lot! Great work!
If the UIView contains UIImageViews with images having an alpha channel, the right side of the images or UIImageView are purple… It’s very bad if you use a image with rounded borders. Any idea how to fix that?
Hey Sean, thanks for the wonderful article! I started out with your approach, then refined it to something that I think is simpler, and includes live updates. I wrote about it here if you’re interested: http://coffeeshopped.com/2010/03/a-simpler-magnifying-glass-loupe-view-for-the-iphone
Thanks,
Chadwick
Hi Sean,
Thanks for this code, it’s really useful. I’d like to use it in an app I’m writing at the moment, what’s your stance on copyright/licensing?
Thanks,
Joe
Thanks a lot.
How can i use it inside UIScrollView ?